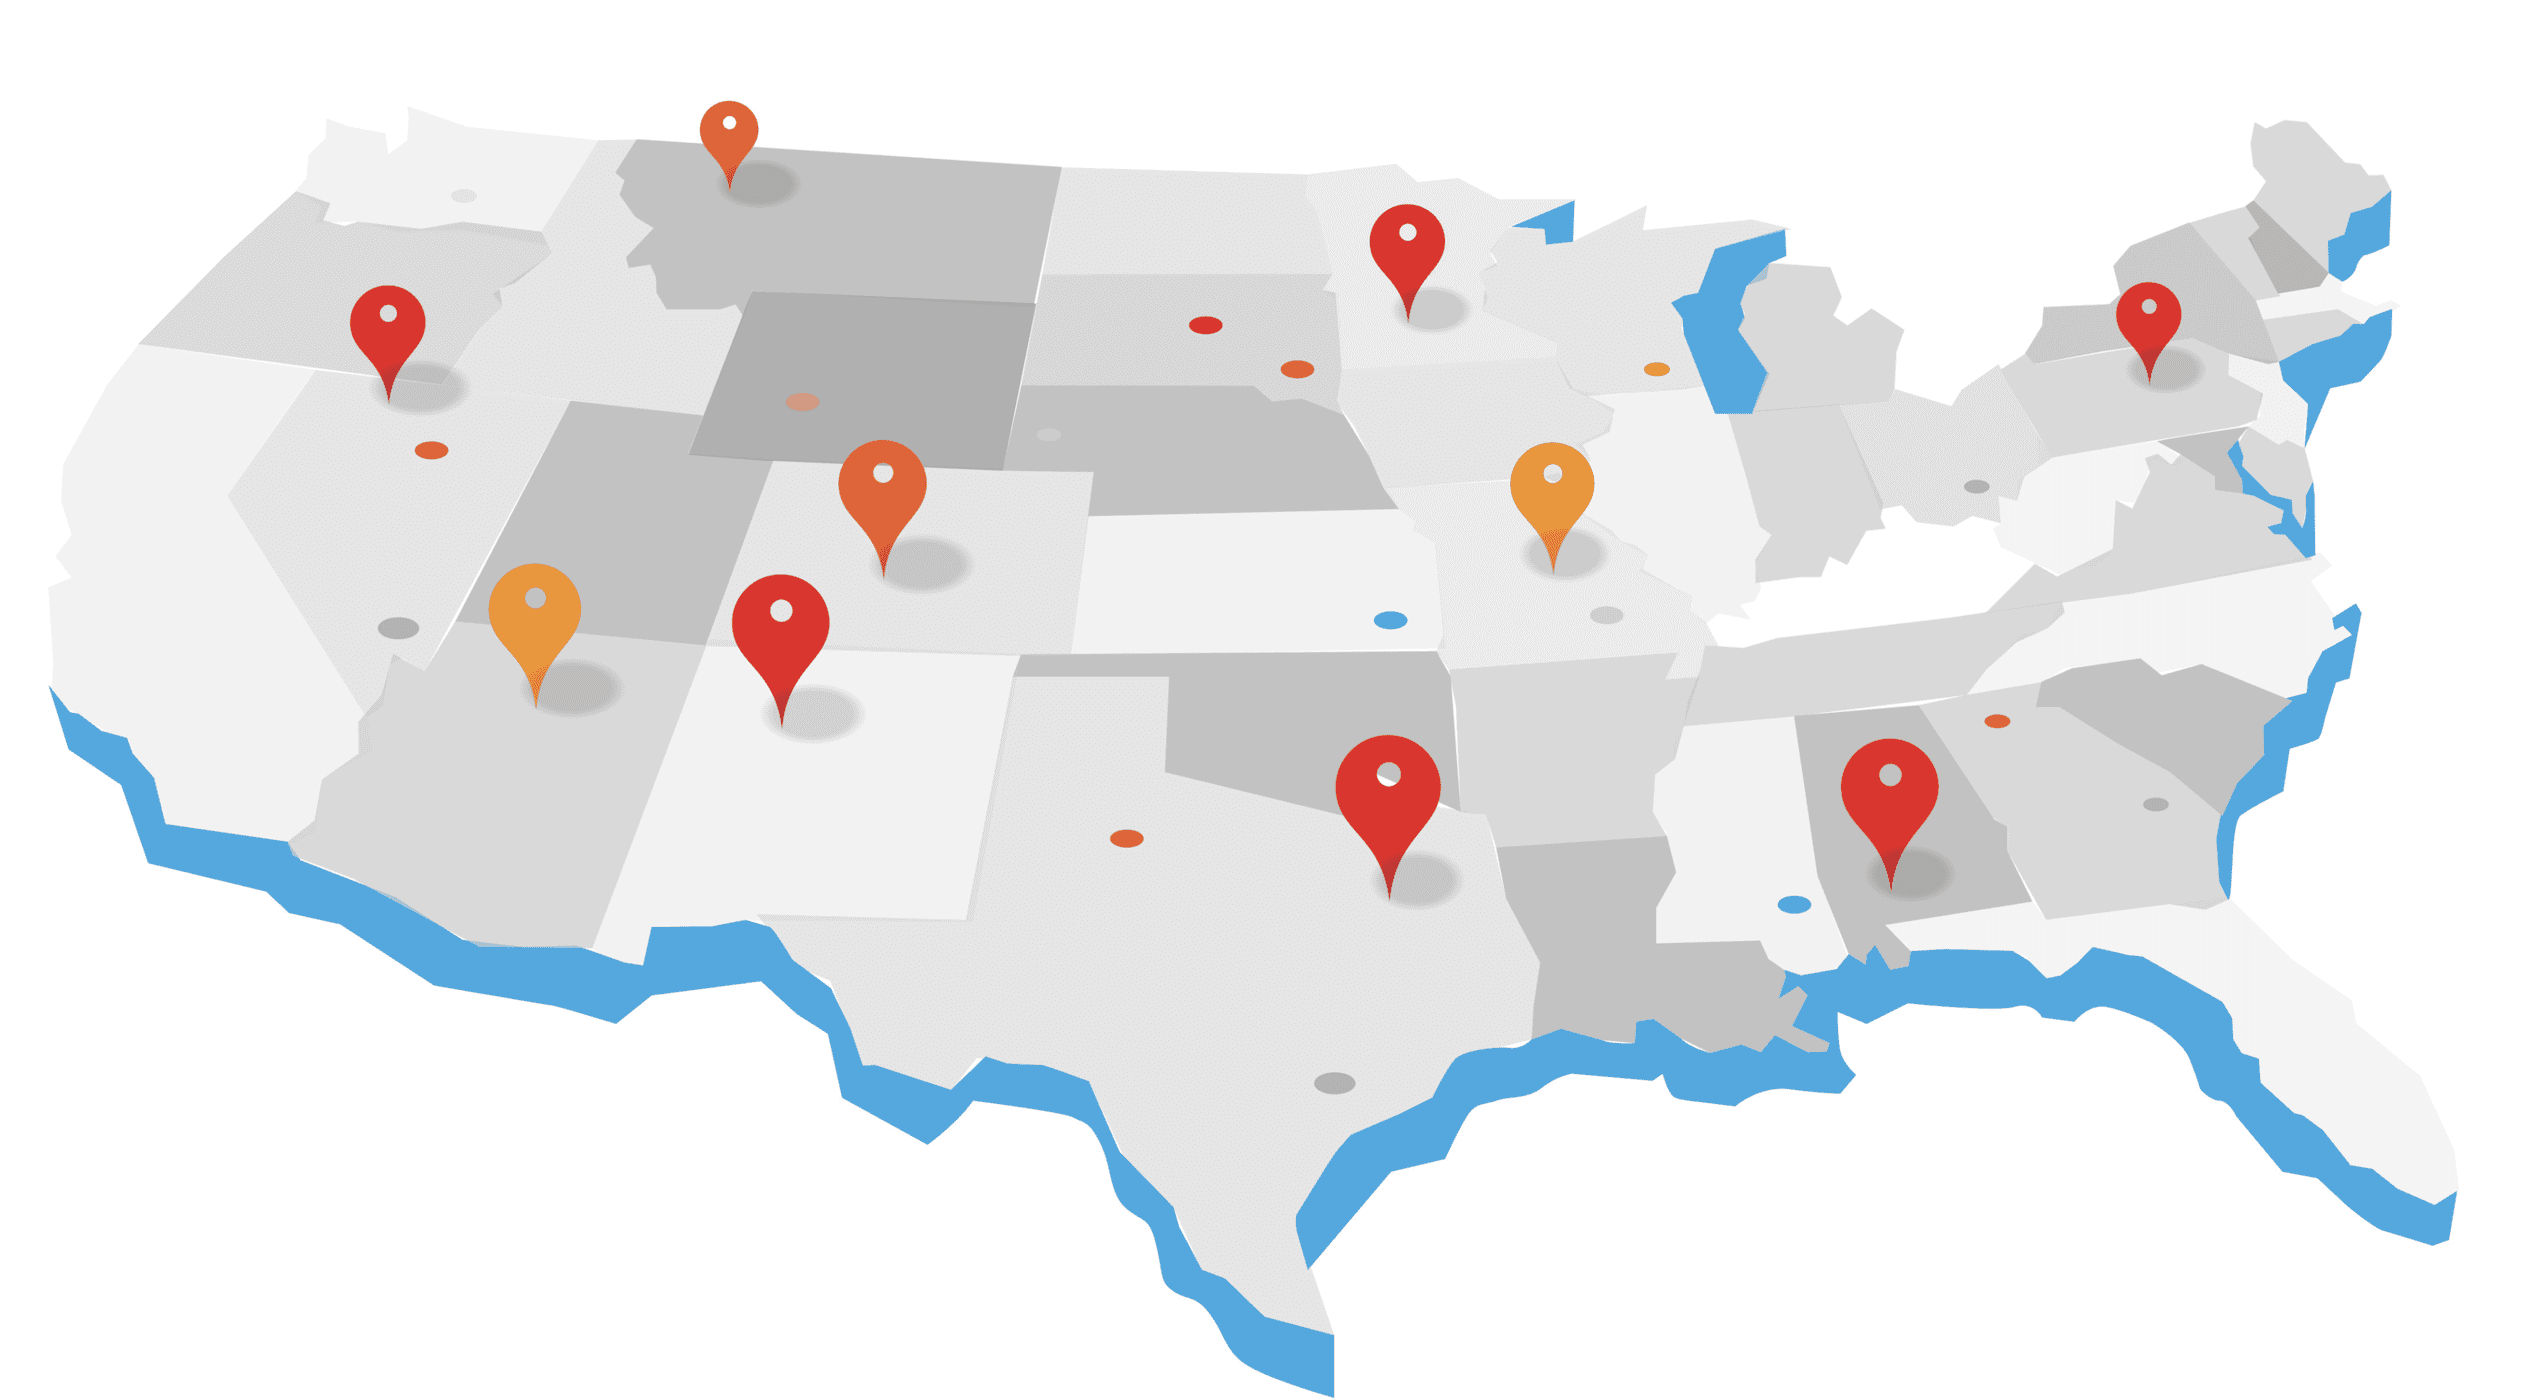
Hisense AW1021CW1W review: A smart window air conditioner that’s missing one key ability

|
,

With the summer days heating up more year after year, air conditioning is just one way to stay cool. Not everyone has central air or can install central air, fortunately, there are other solutions out there.

Estimated reading time: 13 minutes

Our Hisense AW1021CW1W review looks at a 10,000 BTU air conditioner that is installed in your window and has a few smart features as well. Read on for our full review!

The Quick Take

If you don’t have central air or are looking to just cool down one room, the Hisense AW1021CW1W 10,000 BTU window air conditioner is relatively easy to install, has great cooling output, and can even be controlled remotely with an app. However, due to the lack of an inverter within it, it is missing one key ability: the option to have it automatically turn on when the room temperature reaches a certain level. Even though it does have the ability to be controlled by Alexa or Google Home, you still have to manually turn it on. That said, it’s a minor inconvenience. If you’re keeping an eye on the temperature inside your house remotely, it will turn itself off once your room has cooled to a determined temperature.

Specifications

The Hisense 10,000 BTU window air conditioner we reviewed has the following features and specifications:

  • 10,000 BTU window air conditioner, electronic control
  • Electronic controls with 4 modes and 3 fan speeds
  • 4-way air direction directs cool air evenly throughout the room
  • Easy-to-install window kit included
  • Smart Control: Connect from anywhere with the Hisense ConnectLife App (Android, iOS) to change settings or monitor your window air conditioner – works with Google and Alexa
  • Energy Efficient: Energy Star means it is more energy efficient and helps reduce your utility bill
  • Washable Filter: Washable filter helps to reduce bacteria, odours, and particles.
Model #AW1021CW1W
Cooling Capacity (BTs/hr)10,000
CEER (Combined Energy Efficiency Rating)12.0
CoverageUp to 450 sq. ft.
Dehumidification (Pints/24 hours)26.4
RefrigerantR-32
Airflow (cfm) low – high198-285
Noise Level in dB(A)56-58
Voltage/Freq/Amps115V/60Hz 10.1A/7.5A
Plug Type/NEMA#A/5-15P
Watts – Cooling840
Electrical Receptacle115V/15A
Power Cord Length6 feet
Thermostat TypeElectronic
Fan Speeds3 (low, medium, high)
ModesCooling, Dehumidifier, Fan
Eco ModeYes
Display TypeLED
TimerYes
Sleep ModeYes (remote)
Filter MonitorYes
Smart TechnologyYes, via ConnectLife App
Chassis TypeFixed
Air Deflection4-way
Air Discharge TypeTop
Washable FilterYes, easy access
SafetyUL
Energy StarYes
Dimensions (inches)18.9w x 14.6h x 21.9d
Weight (lbs)60

What’s in the box

  • Hisense AW1021CW1W 10,000 BTU window air conditioner
  • Installation Kit
  • Remote Control
  • 2-year warranty
What's included with the Hisense AW1021CW1W window air conditioner
What’s included with the Hisense AW1021CW1W window air conditioner.

Design

If you’ve seen a window air conditioner before, the Hisense AW1021CW1W 10,000 BTU window air conditioner is pretty standard fare. Measuring 18.9″w” in width, 14.6″ in height and 21.9″ in depth, it is white in colour. As for the weight side, it does have a net weight of 60 lbs. That being said, once installed in my kitchen window, I had no problems with instability and the window frame held it just fine without needing additional brackets. As for the weight side, it does have a net weight of 60 lbs. That being said, once installed in my kitchen window, I had no problems with instability and the window frame held it just fine without needing additional brackets.

The bottom two-thirds of the air conditioner unit is the front vent grille which, when removed, allows you access to the washable filter. Just above this is the display panel. From left to right you have the Hisense logo, the Wi-Fi Connect button, Timer/Sleep/Filter LED notifications, the Fan speed button with Low/Med/High indicators above it, the temperature down button, the LED desired temperature setting display, the temperature up button, Mode button with Fan/Dry/Cool/Eco indicators above it, the Power button, and finally the Energy Star logo (note, all the buttons are capacitive touch buttons). At the top of the air conditioner is the 4-way air deflection vent.

Detail view of the control panel on the Hisense AW1021CW1W window air conditioner
Detail view of the control panel on the Hisense AW1021CW1W window air conditioner.

Both sides and the top of the air conditioner have exhaust vents for cooling, and the typical thin silver finned exhaust vent is at the back. Like almost any unit that has this style, they are very fragile and bend really easily at the slightest touch.

The Hisense 10,000 BTU window air conditioner also includes a small remote. It measures roughly 1 3/4″ in width, 4 1/4″ in height, and 1/4″ thick. With it, you can turn the air conditioner on or off, control the fan speed, set the mode, adjust your desired temperature, set the dimmer, sleep and timer functions, and reset the filter notification once you’ve cleaned it. The remote takes a standard CR2025 3V battery.

As far as design goes, the Hisense AW1021CW1W is pretty standard fare.

Installation

The first thing you absolutely need to do when getting a new window air conditioner is to make sure it fits. In my case, my window is 20.5″ wide, and given the air conditioner unit is 18.9″ wide, I assumed it would fit. However, I didn’t take the installation kit into consideration and according to the Hisense website, the unit fits windows 24.9 to 39″ wide. The good news is that I was able to make the air conditioner fit with a very small modification to the installation frame. It was a tight fit, but it is secure, airtight, and does indeed fit a 20.5″ window, but I wouldn’t go smaller than that.

Aside from sizing, installation was pretty straightforward and Hisense has a great set of instructions to follow. You will need a few extra tools including a tape measure, a Phillips screwdriver, scissors, a cordless drill with a 1/8″ bit, a level, and a pencil. I won’t go into too much detail but the basic steps are as follows:

  1. Both the top rail was installed on the air conditioner and side curtains were installed in the curtain housing, but if not they are easy to install.
  2. Attach the side curtains to the side of the air conditioner. In my case, I had to remove the side curtains and cut half an inch off the top and bottom of each curtain rail to make it fit in my window.
  3. Remove the screen from your window.
  4. Cut the adhesive seal to fit the bottom of the lower window and apply.
  5. Center the air conditioner in the window. There is a bottom rail that sits nicely in the bottom of your window frame in the sill and the bottom window fits nicely into the top rail, holding it in place.
  6. Pull each side curtain to width and screw it into the bottom of your window frame with the included screws.
  7. Install the frame lock to the window sill on either side to help keep the curtains open.
  8. Screw the right-angle sash lock above the bottom sliding window to hold it closed and in place.
  9. Measure the curtain housing on the inside and cut the included EVA Foam then place it over the curtain housing to minimize air leaks and ensure optimal insulation. In my setup, even though I removed the curtain itself, I still used a thin strip of the EVA Foam to add extra insulation around the unit.
  10. Insert the included foam seal behind the top of the bottom window to make a better seal. Optionally, you can do the same on the outside of the window at the bottom of the top portion.
  11. Check the gap at the bottom of the air conditioner where it sits in the window sill and seal it with the included adhesive seal if necessary.

Once installed, the bottom of the air conditioner sits about 5″ inside the window while the top sits about 4″ inside it (due to the angled top vent). On the outside, the back of the unit extends about 15 1/2″ out. As mentioned above, it does weigh 60 lbs but I had no issues with weight once installed and additional outside brackets aren’t necessary.

Inside view of the Hisense AW1021CW1W window air conditioner fully installed in a window
Inside view of the Hisense AW1021CW1W window air conditioner fully installed in a window.

Ease of Use

After you’ve installed it, you can use the Hisense 10,000 BTU window air conditioner out of the box with the included remote controller or the capacitive buttons on the air conditioner itself. However, you will want to install the ConnectLife app to be able to control and monitor it remotely.

Without the app, pressing the power button will turn it on or off after which you can switch the mode from the default Eco mode and set your desired cool temperature. Unfortunately, you have to do this every time you switch it on as it does not remember your previous setting. For example, if you have it set to Cool, low fan, and 18°C, the next time you turn it on, it is set to Eco, high fan, and 18°C. Switch to Cool and the temperature defaults to 24°C with the fan still on high. It’s a minor inconvenience but it is a smart air conditioner after all so you’d think it would at least be able to remember the previous settings you used.

Software

To get more out of the Hisense AW1021CW1W 10,000 BTU window air conditioner, you’ll want to install the Hisense ConnectLife app, available for Android and iOS. You will need to create a profile, but you can sign in with Google to make it easier. Next, allow (or disallow) the app to send you notifications, and then you can add a device. If available, you can scan a QR code on your device or allow ConnectLife to access your location in order to pair up with the air conditioner unit.

Tap the “Start here/Add appliances” tile then “Look for devices in your network.” Turn on the air conditioner, and then hold the Wi-Fi connect button for about 6 seconds until the unit beeps and the Wi-Fi light starts flashing. The app should notify you that ConnectLife needs to use a temporary Wi-Fi network (the A/C unit’s) to connect. Open your Wi-Fi settings on your phone, select HIS-XXXX, and return to the app. Once in the app, you will be prompted to enter your Wi-Fi network name and password. Once successfully connected, you can add a room name and assign the air conditioner to that room.

After you’ve added the unit to the app, the home page will display a tile with what you named it, Kitchen AC in my case. It will show the current status (i.e. Off or Cool/16°C/Low fan). Tapping the tile will let you turn it on or off, adjust the target temperature, mode, and fan speed. You can also set up schedules to turn the unit on or off at specific times, run self-diagnostics, share device access with another user, look at manuals, book service, or change settings like toggling notifications and the preferred displayed temperature units (C or F).

Along the bottom of the app are buttons for Home, Devices, Automation, Menu, and a + sign to easily add more Hisense devices. The devices page looks pretty similar to the Home page with the addition of an Add Appliance tile and Manage Rooms function. Automation lets you set up scenes that trigger events when a certain threshold is met. Excited about this feature, I set one up to turn the AC unit on when the temperature was equal to or higher than 20°C and another to turn it off when the temperature in the kitchen was equal to or lower than 17°C. Unfortunately, auto-on only works with the air conditioner units with an inverter control, which this model does not but Hisense does have a model of. I don’t understand why the app still lets you set this up knowing this particular unit doesn’t support it.

ConnectLife Android app screenshots showing window air conditioner display and control
ConnectLife Android app screenshots showing window air conditioner display and control.

That being said, with the schedule set up, when I manually turned on the unit, I did get a notification saying the action successfully completed. The auto-off feature worked as one would expect, shutting off the unit once the desired temperature was reached. The scheduling by time also worked as one would expect.

Finally, the Menu button lets you edit your profile, view the manuals for your devices, manage rooms, access app settings including voice and other app settings (more on that in a minute), and update the firmware of your devices.

The app and unit are compatible with Amazon Alexa and Google Home, however, you can only set up Alexa under the “voice and other app” setting within ConnectLife. Google Home was pretty easy to set up as well, you just have to go through Google Home and connect to the ConnectLife service under the “Works with Google” option. Sadly, connecting it to Google Home still did not allow me to set up an automation to have the unit turn on when my Nest thermostat was reading a certain temperature.

Performance

Given our kitchen is about 250 sq ft, you’d think this window air conditioner was overkill. We found that it did an excellent job when set to cool and low fan in not only bringing down the temperature in our kitchen (which is south facing) but also the rest of the main floor which mainly consists of our living room (which adds about another 350 sq ft to the mix). Sure, the kitchen was much cooler but even coming in the front door at the other end of the living room, you could feel the difference. Walk up a few steps off the entryway to the second floor and you could easily feel the temperature rise.

Inside view of the Hisense AW1021CW1W window air conditioner fully installed in a window
Inside view of the Hisense AW1021CW1W window air conditioner fully installed in a window.

As far as noise level is concerned, it wasn’t overly loud, but you could definitely tell it was on. When turned up to the high fan setting, as one would expect, the noise level was quite a bit more but you could still hold a normal conversation while in the kitchen relatively close to the unit.

Price/Value

Window air conditioners aren’t exactly cheap. Typically speaking, you’re looking at spending at least CAD$400 on one.

When we first received our review unit, the Hisense AW1021CW1W was listed at your typical pricing. However, it is currently listed on Amazon for CAD$247.28 as the regular price, which is a very good deal given its build quality, performance, and ease of use. Oddly enough, it is more expensive in the US, available at Lowe’s for $389 which converts into roughly CAD$530, so it’s possible Hisense is just having a deal on Amazon Canada at the moment. Sure, it could use a bit more smarts — namely being able to turn on automatically when a certain temperature is reached — but as I mentioned before, there is a slightly higher-end model with the inverter required for that feature.

Wrap-up

With the Hisense AW1021CW1W 10,000 BTU window air conditioner installed in our kitchen window, it did a fantastic job of cooling the kitchen, as well as the living room due to the open-ish concept of our main floor. It cools relatively quickly, has plenty of settings, and can be set to shut off automatically once a certain temperature is reached. The only feature missing from this window air conditioner due to it not having an inverter is being able to set it up to turn on when the room temperature hits a certain level.

Hisense AW1021CW1W 10,000 BTU window air conditioner

USD$389/ CAD$247.28

Design

9.0/10

Installation

9.0/10

Ease of Use

9.5/10

Software

9.0/10

Performance

9.0/10

Price/Value

9.5/10

Nailed it

  • Solid build quality
  • Can be controlled remotely via app, Google Home, or Alexa
  • Cools relatively quickly
  • Straightforward installation
  • Includes ample insulation
  • Affordably priced compared to other options

Needs work

  • Can't set it up to automatically turn on at a certain temperature
  • Doesn't remember previous settings when turning back on
Previous

Google announces new Android feature drop and brand update

CEDIA Expo 2023: Samsung announces a 98” Neo QLED 8K TV

Next

Latest Articles

Share via
Copy link
Powered by Social Snap